 |
TMGW |
|
Research Log |
 |
TMGW |
|
Research Log |
Note: This is applicable to all versions of TMG although it is really written for v5.0 and later -- and specifically for v7.0.
Chapter References are to chapters in the book Getting the Most out of
The Master Genealogist.
For more information about the book, see the Wholly
Genes On-Line Store.
The Research Log could also be called your “To Do” list. This is the place where you record those items (Research Tasks) that you wish to research on your next trip to the library or any other place where information may be found. These Research Tasks may be the basis for questions to ask in an interview with someone. The interview may be formal in which you record the conversation using tape, video camera, or just paper and pencil. Or it may be just a question asked of “Gramma” or “Aunt Jane” during a family gathering.
Research Tasks can be created and assigned to (associated with) a person, an event (a Tag), a Source, a Repository or all of these or none of these. Most Tasks will be assigned to a Person or to an Event (a Tag). But some will be assigned to a Source (e.g., some book you want to check on at the library), or a Repository (e.g., you want to see if the library has certain documents). A Task may be assigned to (associated with) one of these or any combination of these.
If the Task is not associated with at least one of these (Person, Event, Source, or Repository), it is called a General Task. A General Task is just like any other except that it may apply to a majority or even all of your data set. For example, you may be methodically researching each census for a county. You could create a General Task for “Green County Census.” Since the census films are available at a number of Repositories and there are different Sources for each census, you don’t want to assign a specific Repository or Source to the Task. And since the census will cover many different persons, you don’t want to assign the Task to a specific Person or Event. Thus the General Task can be made and you may track your progress in the Task Memo by entering notes as to where you started and stopped on each census film.
One of the main reasons for assigning a Research Task to a person, event (Tag), Source, or Repository is to make it easy to find that Task later. The reason for finding the Task might be just to update it with later information that you have found. Or you may want to find which Tasks are still pending. This is especially useful when you want to go on a research trip.
The Research Log may be opened
in many places in TMG. Most users
will open it by clicking on the Research Log icon button ![]() in the Toolbar or on already opened entry screen. You
may also access it by selecting Tools > Research Log from the Main
Menu.
in the Toolbar or on already opened entry screen. You
may also access it by selecting Tools > Research Log from the Main
Menu.
Depending on where you select to open the Research Log, its focus will vary. The focus may be for a person and all the Tasks for that person (which includes any Event Tasks for the person), for an Event (only the Tasks assigned to the currently open Tag Entry Screen), for a Source (only the Tasks assigned to that Source), or for a Repository (only the Tasks assigned to that Repository).
Once the Research Log is open, you may select a different focus by clicking on the down arrow beside the Focus field and choosing the tasks that you wish to display. If you choose Person, Event, Source or Repository, the Task list on the left may display all the Tasks for assigned to the chosen group. You may select to display only the Tasks assigned to a specific Person, Event, Source, or Repository by entering the appropriate ID number associated with that Person, Event, Source, or Repository.
Note: Events (Tags) do have numbers assigned to them, but there is no listing giving the numbers. You can see the Event numbers in various screens, and thus use that number, but it is often easier to go to the Event (Tag) and access the Research Task (Log) from there.
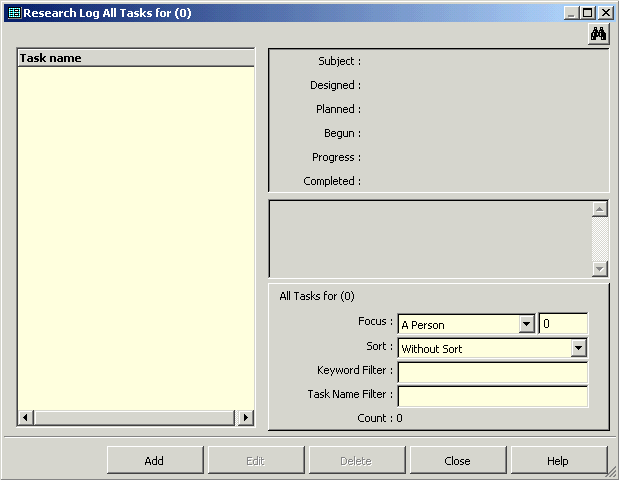
Figure 1: Research Log
The Research Log will allow you to see and control the selection and editing of the Tasks for which the focus is set.
The Task Name panel will list any Tasks for the selected focus. The Task Name is often just a short description of the Task that will help you to find the Task later. When a Task Name is highlighted the details of that Task will be displayed in the windowpanes on the upper right. This includes the various dates associated with the Task and any Task Memo text.
The lower right of the Research Log contains the following fields for controlling the focus:
Focus. This is the basic
control and indicator of the contents of the Task Name list on the left of the
window. You may choose a focus of:
All Tasks
General Tasks
A Person
An Event
A Source
A Repository.
If you choose a selection other than General Tasks, a field to the right will appear in which you may enter a number representing the Person, Event, Source, or Repository. If no entry is made, then the focus will be all Tasks attached to the Focus selection.
Sort.
This option allows you to tell TMG in which order the Tasks should be
listed in the Task Name list on the left. The
options are:
By Principal1
By Principal2
By Task Name
By Designed Date
By Completed Date
By Type of Task
Without Sort
The Type of Task option refers
to the Type of attachment the Task may have – to a Person, an Event, a Source,
a Repository, or as a General Task with no attachments.
Keyword Filter. You may further restrict the focus of the Research Log to certain Keywords by entering the Keywords in this field.
Task Name Filter. If you are only interested in Tasks having certain word(s) in the Task Name, they may be entered here.
Note that if you change the focus, it may take a moment before the correct list of Task Names are displayed. This is because you may choose many different combinations of Tasks (Person, Event, Source, Repository, General, sort sequence, Keyword Filter, and/or Task Name Filter).
After TMG has applied all the entered focus options, it will display the Task Names in the field on the left in the selected sequence. The total number of Tasks found and displayed will be shown in Count below the selections.
At the bottom of the Research Log are the following buttons:
Add. This button is used to create a new Research Task.
Edit. After you highlight a Task Name on the left, you may display and edit the Task by clicking on this button.
Delete. You may delete a Task that is no longer needed by highlighting the Task Name and clicking on this button.
Close. This button closes the Research Log. All Tasks are saved but not focus selections are saved.
Help. This button will display the Help for the Research Log.
To create a new Task, click on the [Add] button that will display the Research Task window (see Figure 2 below). Depending on the focus of the Research Log some parts of the Research Task will be completed for you although you may change any or all of these.
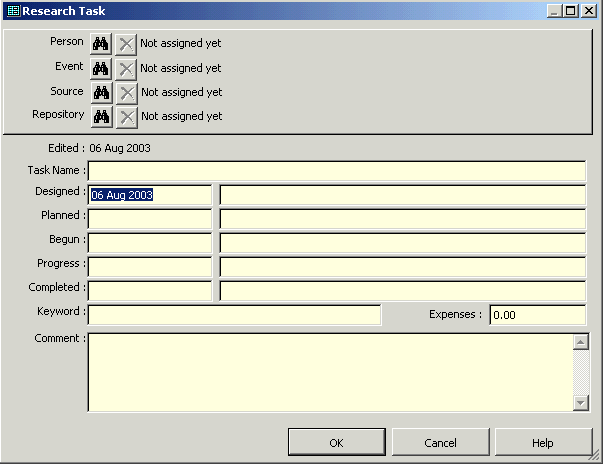
Figure 2: Research Task
Note that the top panel of the window allows the control of the assignment of a Person, an Event, a Source, and/or a Repository. One of these may be entered automatically depending on the focus when you clicked to add the Task. If you wish, you may add one or more others or change the one depicted, or delete the one depicted. A General Task will not have any assignments made.
To finish creating the Task, enter data as desired in the fields of the lower part of the Research Task window.
Task Name. Enter a short description of the task. This will be something that will help you find the Task later and will help you remember the basics of the Task.
Designed. This is already entered and is the date that you created the Task.
Planned. This is the date that you planned the Task. The design of a Task may only be the basic concept of it and any details or planning for the associated research will often come at a later date. Of course, some Tasks will not require any real planning in that they are so simple (ask “Gramma” when she was married).
Begun. You would enter the date you started the work on this Task in this field. Only needed on some Tasks as many will only require a short time to complete.
Progress. For some Tasks you will want to enter dates showing when you worked on the Task.
Completed. The date that you finished working on the Task would be entered here. An entry in this filed would indicate that you do not intend to work on this field again.
Date Text Fields. To the right of each of the above date fields is a text field that you may use to enter short notes. It is suggested that you limit these notes to not more that a few dozen characters as that is all that will display in the Research Task window. The maximum length of this text is about 100 characters however, and all of it will print in reports. See Figure 3 for an example of a completed Research Task.
The date and date text field are not required entries except as you wish. Even the Designed date may be erased if desired although it is suggested that the Designed and Completed dates have entries along with possibly the Progress date so that you can easily select the desired Tasks for the focus of the Research Log and/or the List of Tasks report (See Chapter 10, Customizing Reports).
Keywords. This is where you would enter words or codes to help you find and select various Tasks. The code may be abbreviations, initials, or acronyms. They may indicate possible places where you might find the information (LIB for the local library, CH for the courthouse), or the kinds of information (CENS for census data). Keywords can help you select the tasks and group them for common work or research. For example, the code MARR might be used to group all the Tasks related to finding marriage information. For more on this topic, see the separate article on Research Task Keywords.
Expenses. Enter the total expenses for this Task. Professional researchers may use this more than the user that is just researching their own family. But this can be used effectively to help track the costs of research.
Some users may digitize family information by creating a TMG project or data set for someone and may wish to keep track of their time for doing it. They could create a General Task to retain that information.
Comment. This is called the Task Memo and would include any information desired to be entered. This may be time spent on this task, progress notes including that data was found or not found in certain places or sources, thoughts about where data may be found, etc. It is suggested that this entry be fairly verbose and should include data that might be in the TMG project. This would allow the user to have the information if only the Research Task information was available while doing research.
[OK]. When you finish creating or editing a Task, click on the [OK] button to save the entry or the changes.
[Cancel]. You may click on the [Cancel] button to not create a Task or to discard any changes you have made to a Task.
[Help]. This button will display the Help information for Research Task.
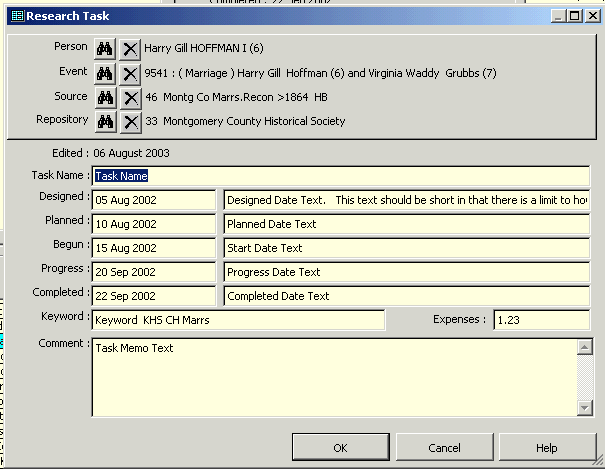
Figure 3: Completed Research Task
Making Use of Research Tasks.
After you have entered a number of Research Tasks, you will want to use them in planning a trip. Now the trip may only be to your local library or courthouse or it may be a trip of hundreds of miles to go to the National Archives, the area where your ancestors lived, to the Family History Center of the Church of Latter Day Saints in Salt Lake City or to some other large genealogical library like the Allen County Public Library in Fort Wayne, Indiana.
Regardless of where you go, you will want your time there to be useful and productive. You certainly don’t want to go there and then after returning home finding that you forgot to look up something.
So you will want to create a List of Tasks report described in Chapter 10, Customizing Reports. After creating that report (possibly to Screen first), review it and see if the information in the report is enough by itself to allow you to do the research intended. You may want to edit one or more Tasks for planning purposes by adding a married name for a spouse, names of siblings, names of places, known dates or a range of dates suspected. The Comments field is unlimited in size and text may be entered in either a very terse or a very verbose manner. After planning the Tasks for the trip, generate another List of Tasks report to take with you as a reminder of what you want to accomplish. It is also a good place to take notes so that you can update the various Tasks after you return from the trip.
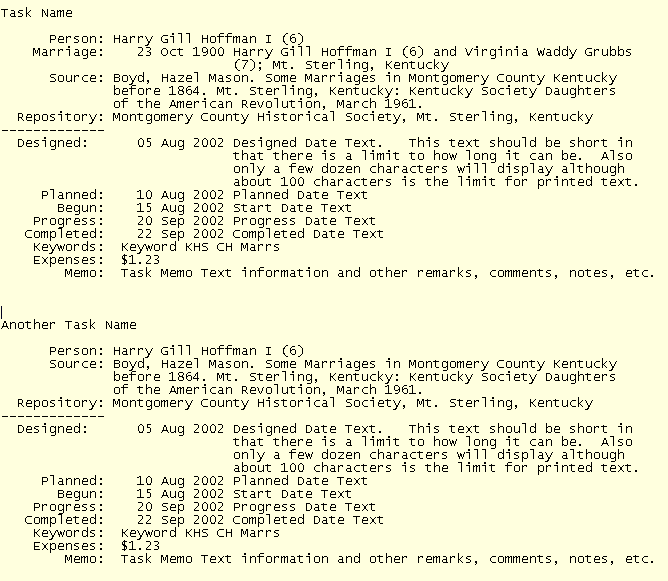
Figure 4: Example List of Tasks Report
The example List of Tasks report in Figure 4 above shows two tasks with similar interests. The first is a Task attached to a Person, an Event, A Source, and a Repository based on the example data shown in Figure 3 above. The second is essentially the same Task as it would be if it were not attached to the Event.
Note that the following were
entered as Keywords:
Keyword
KHS
CH
Marrs
The first is an example of a
full word used as a Keyword. The
next two are initials (KHS = Kentucky Historical Society, and CH = courthouse).
The last is just an abbreviation of a word illustrating that you may
categorize your Tasks if you intend to only concentrate your research during any
single research trip.
Note that the example List of Tasks report is a full report. You would generally not want a full report. The Task Name and the data on who or what records to which the Task is attached (shown above the dashed line will always print. I often add only the Task Memo and since I include everything that I think may be needed on a research trip, this is all I need.
Comments to: Lee Hoffman
Return to TMG Tips Home Page.
Return to the TMGW v6.0 Tips and Suggestions