1. Make a backup of your main project, just in case. This is not
required for the objective, but just good practice.
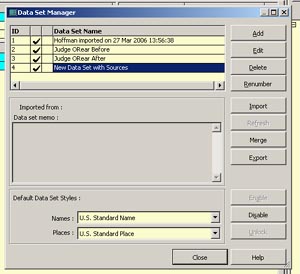
2. In your main project in TMG, open the Data Set Manager (DSM) (from the
File menu or right-click/select within the Project Explorer). This
will give the following window.
|
|
Notes: a. There are four data sets shown here. You may or may not have more than one data set depending on how you are using TMG normally. b. If you only have one data set, that is fine -- it will be your main data set. c. If you have more, one will be your main data set and all operations here are based on that main data set having the Sources, etc. that will be copied. If the Sources, etc. are in a different data set then you will need to mentally adjust the steps below to refer to the appropriate data set when I refer to the main data set. d. The only data set needed to be enabled (active) is the main data set containing the Sources, etc. |
3. Click on the [Add] button. This will start the process to create a
new data set (DS) and will display the window below.
4. Enter a name for a new DS (say Temp or New DS w/Sources or what ever
you like).
5. Enter a DS Memo, if desired. (After the procedure is
finished, you may or may not keep this new data set as it is only needed for
the procedure).
6. Select the items below the Memo to be copied to the new DS. You
may select all, but if you only want Sources, then you should select Source,
Repositories, Master Place List, and Styles as Flags and Tag Types are not
required.
7. Make sure that the DS that contains the Sources, etc. that you want
copied is shown in the slot above the selections. Use the down arrow button
at the right of that field to see all DS and to select the right one.
8. Click on the [OK] button to create the new DS.
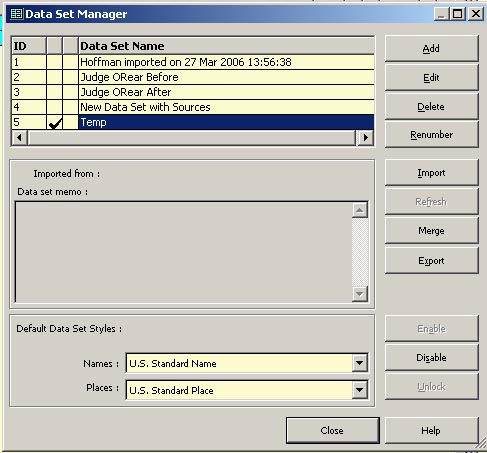
9. When the DS creation is finished, disable all other DS except the new
one (highlight each in turn and click on the [Disable] button). The DSM
should (depending on the number of DS in the project) look something like
shown below. You may leave the other DS enabled, if you wish.
But you will need to make sure that step 11 below is performed only in the
new DS.
10. Click on the [Close] button to close the DSM.
11. Now add a new person -- anyone. You just want a person. Use anything
you wish as the name -- "A. Person" if you wish, selecting whatever Sex you
wish.
At this point, you have a DS with the Sources, etc. that you selected in
step 6 above plus a single person. The location of the "received" DS
will determine what you do next. If the "received" DS is in the same
project as your main data set, skip Part B below and go on to Part C.
If the "received" DS is located in a different project from your main data
above, then do the steps in Part B.
Part B -- Merging Projects to Have Data Sets in the same Project
1. The following is the safest way to do the merging. Some steps
(marked with an asterisk (*)) are not required if you are willing to take
the risk (the backup in Part A notwithstanding).
2. * In TMG, select File=>Close Project from the Main Menu. This is
required to copy a project.
3. * Select File=>Copy Project from the Main Menu.
4. * Browse to find and select your main project above and click on the
[Open] button.
5. * Acknowledge the notice.
6. * In the Create a Project window, browse to the desired folder, enter a
project name (say TEMP), and click on the [Open] button.
7. * Watch the progress bar and acknowledge the notice when complete.
8. Now open the copied project (TEMP).
9. * If you performed the copy project steps (2 through 7 above), open the
DSM and highlight in turn each DS (other than the Temp DS) and click on the
[Delete] button. Remember that, at this point, you are working with a copy
of your project plus you have a backup, so nothing will happen to your data.
The point here is that only the Temp DS will be in the project.
10. When you only have the one DS (Temp) left in the DSM, click on the
[Close] button.
11. TMG will probably ask if you wish to Optimize to which you should
answer Yes.
12. Now close the TEMP project and open the project containing the
"received" DS.
13. Select File=>Merge Projects from the Main Menu.
15. Click on the ellipsis [...] button at the right of the Project B field,
browse to find the copied project that you just processed and optimized (or
your main project if you did not copy the project (steps 2 through 7 above),
highlight that project and click on the [Open] button.
16. Ensure the Import B to A option is selected.
17. Click on the [OK] button.
18. Acknowledge the completion notice.
19. If you did the merge using your main project, then you may wish to
delete the main DS from this project (as in step 9 above). For the purpose
of this procedure, the only DS that are needed here is the "received" DS and
the Temp DS. So if you have other DS, you can decide if they need to
remain or be deleted.
Part C -- Merging Data Sets
At this point you should have a project with:
1. The "received" data set.
2. The Temp DS from Part A above.
It may also contain you main data set as well as any other DS in the
project.
1. Open the DSM, and ensure that the "received" DS and the Temp DS are
both enabled. Other DS may be enabled,
but are not required for this procedure.
2. Highlight the "received" DS and click on the [Merge] button.
3. In the Merge Data Sets window (similar to that shown below), the
"received" DS should show as Data set A.
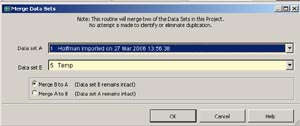
4. Also the Temp DS should show as Data set B. If not, click on the down
arrow button at the right and select the Temp DS.
5. Ensure the Merge B to A option is selected.
6. Click on the [OK] button to start the merge. This causes the DS
with the one person and the Sources, etc. to be appended to the end of the
"received" DS.
7. Acknowledge the completion notice.
8. (Optional) Highlight the Temp DS.
9. (Optional) Click on the [Delete] button as this is no longer needed
(answer Yes that you are sure).
10. Click on the [Close] button.
11. Again allow TMG to Optimize if it asks.
This completes the process and you should have your Sources, Repositories,
places, and Name and Place Styles from your main project and other options
you selected in the "received" DS.
Comments to: Lee Hoffman.
Return to the TMG Tips Tutorial Page
Last revised: