|
|
Completely Separate Multiple Projects in TMG |
|
|
Note: This paper applies to TMG v7.0 and after |
||
|
|
Completely Separate Multiple Projects in TMG |
|
|
Note: This paper applies to TMG v7.0 and after |
||
User Data
A user may need to answer the question of how much isolation between projects is needed. For many users, no isolation is needed while for others complete isolation is needed. And then others will only need some isolation. All of this may be achieved in TMG by any user.
For this discussion, we will assume here that the user has installed TMG in the default configuration. If the user has installed TMG using the Advanced options described in the Data File Storage topic in Help then the user will need to adjust this discussion based on that difference. The Data Files Storage also describes the three basic kinds of file storage used in TMG. Those three storage areas are:
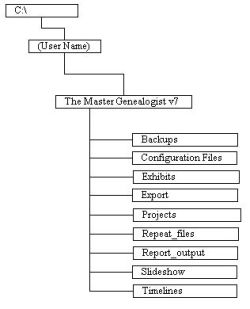
When a user first installs TMG, the environment of the installation is designed for basically a single project (other than the SAMPLE project). However, the design permits the user to add as many other projects as are needed. For this reason, we want to look at the User Data folder in the user’s Documents (My Documents) folder. This folder is normally entitled “The Master Genealogist v7” (in the default installation) and its location in the user’s Documents folder indicates it use as the User Data folder.
 The default TMG installation
will also vary slightly between WinXP (and earlier) and WinVista or Win7.
Mostly this is between how the user accesses file in the user Documents or My
Documents folder. I will refer to the folders using the WinVista/Win7 style
(Documents). Those still using WinXP and earlier versions of Windows will need
to make the changes in the file paths. Thus the default TMG installation
(for v7x) will be like the display on the left
The default TMG installation
will also vary slightly between WinXP (and earlier) and WinVista or Win7.
Mostly this is between how the user accesses file in the user Documents or My
Documents folder. I will refer to the folders using the WinVista/Win7 style
(Documents). Those still using WinXP and earlier versions of Windows will need
to make the changes in the file paths. Thus the default TMG installation
(for v7x) will be like the display on the left
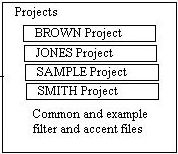
As you can see, all User Data
files are located under the basic The Master Genealogist v7 (TMG v7) folder with
each file group being in a separate sub-folder. When the user starts TMG and
selects to open the SAMPLE project then the SAMPLE project is placed in its own
sub-folder under the Projects folder. The layout now looks like is shown
in the illustration below on the right.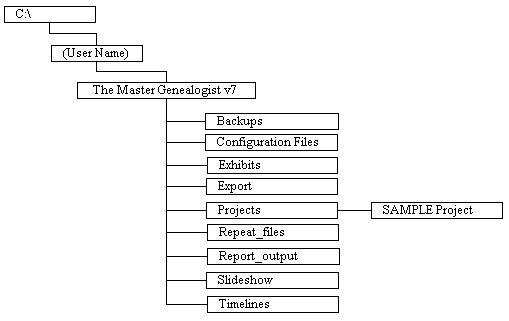
The user will likely then create a new project and by default the new project will be located in the Projects folder. After the project is created, if the user looks at the Projects folder in Windows Explorer, the listing will include the following files (assuming the user named the project JONES):
SAMPLE project folder
End of line ancestors.acc
Females who are not living.flp
JONES_.pjc
There will be many other files in addition to those noted above. But these are the main ones that we will be discussing.
If the user then creates another new project (say SMITH), then the file listing above will be like:
SAMPLE project folder
Born in Virginia or Tennessee.acc
End of line ancestors.acc
Females who are not living.flp
JONES_.pjc
SMITH_.pjc
Thus it may be seen that the two JONES and SMITH projects will have all their data files located in the same PROJECTS folder. While this may be just fine, most experienced computer users will want the projects in separate folders. Thus it is recommended that the JONES and SMITH projects be changed from the Project folder to each project’s own sub-folder in a similar way to the SAMPLE project. This may be easily done as follows:
- Be sure to make a backup of the project that you are moving to a new folder.
- Open TMG and select to open the SAMPLE project to get to the main TMG display.
- Select File=>Copy Project from the Main Menu.
- In the Select a Project to Copy window, highlight the JONES project.
- Click on the [Open] button.
- A notice will display, click on the [OK] button to acknowledge that message.
- The Create a Project window will now display.
- In the upper part of the window, click on the icon that is labeled Create new folder.
- A new folder will be created and highlighted allowing you to change the name of the folder.
- Enter the new name of the folder as the name of the project being copied into that new folder and press the [Enter] key. The folder name may be the same as or different from the project being copied.
- Double-click on that new folder to change focus of the window to the new folder.
- In the file name field, enter the name of the project. It may be the same as or different from the project being copied.
- Click on the [Open] button and the project will be copied.
- When copying is complete, a notice to that effect will be displayed.
- Click [OK] to acknowledge the notice.
At this point, I suggest that you open the copied project and ensure that it looks like it should.
- Select File=>Open Project from the TMG Main Menu.
- Double-click on the folder of the copied project.
- Highlight the project file name.
- Click on the [Open] button to open the project.
Browse through the project and if all seems good then the copy process is complete. If you find something that is wrong then it is suggested that you ask about it in an on-line forum (TMG-L or the Wholly Genes Community Forum). If things look good (or you have cleared up any questions that you may have then:
- At this point, you will probably want to delete the old version of the copied project (the one located in the Projects folder and not the one copied into the new sub-folder under Projects).
- Select File=>Delete Project from the TMG Main Menu.
- The Select a Project to Delete window will display.
- Highlight the file that you highlighted before (Except for the name, it will be something like JONES_.PJC and with end in .PJC.
- Click on the [Open] button to delete the project.
- A notice will display asking if you are sure.
- Click [OK] to acknowledge the question and allow the deletion. (If you are unsure, click on the [Cancel] button).
- Another notice will display giving you one last chance to not delete the project. If you have no questions about the new location of the project then click on the [Yes] button. If you still have questions, click on the [No] button and get those questions resolved before starting this process at step 1 again.
- After clicking the [Yes] button, TMG will delete the project and display a notice to that effect. Click on the [OK] button to acknowledge the notice.
Do the above three processes for each project that you want to move to a sub-folder under the Projects folder. The resulting list above for the Projects folder will now look like:
JONES project folder
SAMPLE project folder
SMITH project folder
Born in Virginia or Tennessee.acc
End of line ancestors.acc
Females who are not living.flp
The User Data folder layout now
looks like the illustration on the right: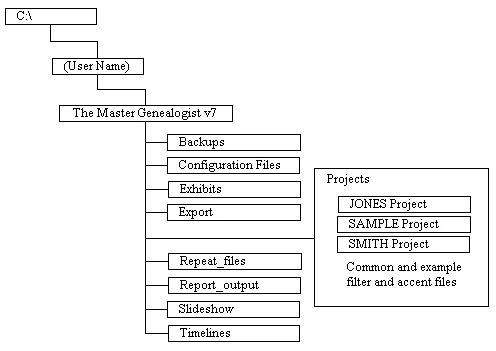
At this point, the only separate files (ones not in project sub-folders) will be common and example accent and filter files. Accent and Filter files are designed to be created and used by individual projects although many filters and accents may be used by any or all projects. If you want any common or example filters and accents from the Projects folder to be available for use in the (say) JONES project then they need to be copied to the JONES sub-folder. This is most easily done by copying those filter and accents using Windows Explorer. Just browse to the Projects folder (or whatever folder contains the filters or accents to be copied), highlight the desired filters and accents and copy them to the desired project sub-folder.
At this point, you may want to make certain of your own common and the example filters and accents available for use with any new project that you create. In that case, again use Windows Explorer to copy the desired common filters and accents from a project sub-folder to the Projects folder. This may include many example filters and accents located in the SAMPLE project sub-folder.
Now when you create a new project, any common or example filters and accents located in the Projects folder will be available to that new project IF the new project is created in a project folder when the project is created. You can create the new project in a sub-folder just like we did above. But if you follow the steps below to create the new project, the project will be automatically placed in its own sub-folder, and the common and example accents and filters from the Projects folder will be copied to the new project sub-folder automatically.
- Select File=>New Project from the TMG Main Menu.
- If you already have a sub-folder for the new project, go to step 6.
- In the upper part of the Create New Project window, click on the icon for Create New Folder.
- As above the folder name “New Folder” will be created and highlighted to allow you to change the name.
- Enter the name of the new project sub-folder and press [Enter]. As above, you can have the same name and the project or it may be different. I keep project folder names the same as the project located in them.
- Double-click on the new folder to change the focus of the window to the new folder.
- Enter the name of the new project in the File name field and click on the [Open button.
- If you already have a project open in TMG, you will be asked if you wish to close it. If you do, click on the [Yes] button and it will close and the new project will be created. If you don’t want to close the currently open project, click on the [No] button, the project will remain open and the new project will continue to be created. Clicking on the [Cancel] button will allow you to stop this process and start over (the newly created sub-folder will remain).
- As the new project is being created in the sub-folder, TMG will automatically copy any common or example filters and accents into the new project sub-folder.
- After the new project (named say BROWN) the listing of the Project folder will be like:
- Now when you open the BROWN project, any filters and accents that were in the Project folder will have been copied to the BROWN sub-folder and will be available for use in that project. Any that you do not wish to remain can be deleted if you desire.
Now we have projects in separate folder and thus are separate from each other. However, there are other files used in projects that may be common to all projects, just some projects, or only to certain individual projects. Most of these files are located in the folders of the TMG User Data layout. These other folders are:
- Backups
- Configuration_files
- Exhibits
- Exports
- FDE -------- (not presently used)
- Logs
- Repeat_files
- Report_output
- Slideshow
- Timelines
Many of these folders will be common to all projects as any file located in a folder can be easily known to belong to a certain project or is common to all projects. Some of these folders may contain files that are specific to a certain project. In such a case, the user will want to ensure that such files be placed where they may be accessed only by the one project. Then there may be some folders whose certain files may be common to more than one project, but not to all project.
TMG allows the user to specify project by project which folders are used by which project. This is accomplished for each project by opening the project and selecting File=>Preferences from the Main Menu, and opening the Advanced option under Current Project Options. The user may then select any Path and change it to some other path making the new path point to a specifically designated folder for the project in question.
To accomplish this, we would copy (using Windows Explorer) the underlined folders above to each project sub-folder and change the appropriate Preferences=>Advanced option paths to the new folder locations. Note that the user may, if desired, copy more of the folders above as desired. It would up to the user to determine how much project separation is needed and which folders are need to be specific to any one project. The following comments may help deciding which additional folder(s) might be copied to some or all project sub-folders.
For example, there would not likely be project corruption if the Backups had Backup files from multiple projects in the same folder. Similarly, the Exports and Report_output folder would probably not cause problems from one project to another. In these three cases, the user may prefer such separation just for personal desire otherwise just leave them alone.
Timelines would also not likely cause a problem by having all Timelines in the same folder although that could be possible. In this case, if a Timelines folder were copied to a specific project folder then there would be redundancy in having most or all the Timeline files being duplicated in two or more folders. If only one or two Timelines were specific to a project then I would ensure that the name of the Timeline reflected the name of the project to help the user remember not to use that Timeline in some other project. This would allow using the default Timelines folder for all projects, eliminate redundancy and thus use less disk space.
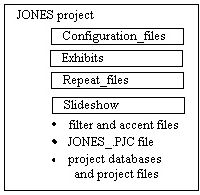
After copying these underlined folders above to each project sub-folder or for a new project sub-folder, the contents of a project sub-folder will look like:
Other project sub-folders would look similar with the difference being the name of the folder and the name of the project. Over time, there may be other differences. There will be new filters and accents that are not in other projects. The Repeat_files folder will contain similar files top the comparable folder in other project, but the content of the files will be different. The Configuration_files folder may or may not contain similar file to that of other projects depending on the reports generated for this project and the configuration of those reports. The Exhibits will almost certainly contain different files based on the project as compared to the other projects. Finally, the Slideshow folder will contain different files based on what Slideshows have been created.
Other Data folders
Now, there are certain files/folders used in projects and these files/folders have not been discussed. These would be the Shared Program Data (SPD) and User Program Data (UPD). Few of the files in these areas would affect users and their projects. But, there are some that could cause problems in some (mostly minor) cases.
User Program Data
The mostly likely files in the UPD that a user would encounter which might cause problems would be Custom Layouts and Toolbars. Still, with discrete Layout/Toolbar naming then this should not be a problem. And with the file layout as discussed for a project sub-folder above, this would not be a problem because any Custom Report Definitions designed for another project would not be available for a different project as the Custom Report Definition would be stored in the Configuration_files folder assigned to the project for which it was designed. Also a filter created for that Report Definition would also be stored in the other project sub-folder. So, a Custom Layout could have a Custom Toolbar with an option to call a Custom Report Definition that used a specific filter designed for a different project. But the Toolbar option would not work because the Report Definition could not be found and any filter would also not be found.
Some other files in UPD relate to web access which is not often customized But if there is customization there may be some momentary user confusion at selecting a web site meant for use with a different project. But there should be no real problem insofar as the project is concerned.
The log of the Message Manager is also located in the UPD folder as is the file to hold the current program configuration as set by the user. Finally, the files for the various DNA templates (not data) are stored here as are color hue files. These are not likely to be customized all that much and it is only a display problem is there is any customizing.
Shared Program Data
As for the SPD, this folder contains folders to hold Buttons and Graphics to use in creating Toolbars and Layouts and for use in other areas of the programs. It also holds Frames to be used by Visual Chartform. It also contains color tint files used by the report writer. The SPD also contains three databases: the State abbreviations database (used at report generation time), the Quicktips database (tips displayed at startup), and the Monarchs database (used with the Regnal Calculator). If there is any customization in this area, it is available to all projects equally.