 |
USING TMG TO TRACK RESEARCH |
| (Note: This was written for TMG v4.x but the prinicples may be used with TMG v5.x.) |
|
USING TMG TO TRACK RESEARCH |
| (Note: This was written for TMG v4.x but the prinicples may be used with TMG v5.x.) |
USING TMG TO TRACK RESEARCH
Cheri Casper
I hate entering genealogy data into any database program. Research, that is the name of the game. Give me a musty library any day. But I often found that I was looking at the same reference materials multiple times. I needed a good system for recording what materials I had looked at, what fruits I had reaped, and I needed some way that was simple and could tie in with my personal filing system and TMG.
After looking at various programs such as Clooz and ByGones, I decided they had too many screens and too many linked databases to contend with. Plus they were just one more program to work with. I tried to create a database in Access that would record my research information. However, my knowledge with Access was limited and I just couldn’t create what I had in mind. Again, it was one more program to contend with.
Then the idea struck me . . . TMG. After all TMG IS a database and I had worked with it for a couple of years. I just needed to make TMG record research information in much the same way as I did data on individuals. This would give me the option to use TMG’s filter, search, and reporting options to output my research information. This is what I devised and what works for me:
I decided to keep my research information separate from my main dataset. I created a new dataset and called it “Rsch.” The first individual in the new dataset is a *person* with no given name and a surname of “AAAMasterTemplate.” By using the “AAA” at the beginning of the surname assures that this template always sorts to the top of the picklist. I recorded all essentials about how to use this dataset in the dataset memo field, including notes myself on how to consistently enter data. I set up flags that help me generate reports and filters. There are some examples of the flags and accents that I use, but you can set up these as you desire.
Here is a screen snapshot of “AAAMasterTemplate”:
I used the following custom tags, however, you can create the tags that work for you:
Since I wanted all entries to have the exact same sequence of tags, I assigned an arbitrary sort date to each tag so the tags appear in the sequence set forth above. These sort dates were assigned to the tags in the AAAMasterTemplate record.
Now that I have a template for each source that I reviewed, these are the steps I follow in creating a record for each of those sources:
1. I go to the AAAMasterTemplate person and select Edit>Copy>Person. After making the copy, TMG will automatically take you to the person view of the “copy.”
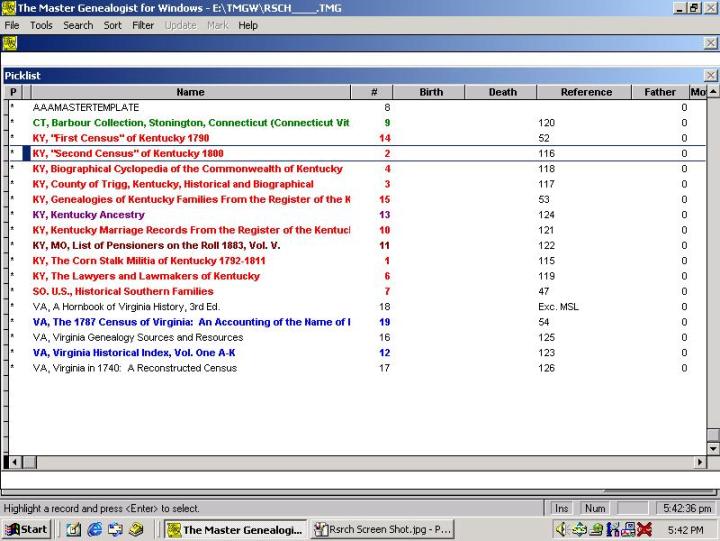
2. Change the name of the Subject. I put the entire title of the source into the Given Name field. If the title of the source is too long to fit in the Given Name field, I put as much of it as possible in that field and the remainder of the title in the Suffix field. It looks a little odd but will print out correctly on any reports, although you may have to manually delete any errant commas that are placed between the Surname and the Suffix. I put a geographic abbreviation, such as VA for Virginia, into the Surname Field, overwriting the information that is automatically placed there when the copy procedure is used. I use the exclusion marker in front of the "surname" to keep it from printing out one the custom Individual Detail report that I use. By using a geographic abbreviation, when I go to the Picklist all sources that relate to Kentucky, for example, sort together. I can use things like “So. U.S.” or “KY, TN” also. This still gives me somewhat of a geographical structure on the picklist. Alternatively, if I wish to see a straight alphabetical listing of all sources, I can opt to have the Picklist sort on the Given Name. Other coding devices could be devised.
3. I set the appropriate flags. I have used Accent colors to denote sources that relate mainly to a specific family line, however, any accents could be at your discretion and to suit your needs.
4. I now begin to fill in the information from the source. Because my desired output is a custom Individual Detail that I subsequently clean-up in MSWord with a macro, I enter ALL information in the Memo field of each tag. I insert a [:CR:] code at the end of EVERY memo field. This carriage return code is important so reports generate with a blank line between each tag. If I have no information, I do not leave the Memo field empty; I use the code N/A.
5. When I come to the Citation flag, I enter a bibliographic citation, complete with formatting codes. I also attach a “Citation” to each tag that contains the citation information. This is a dummy citation that is merely called “Surety” and has no data entered at the Source Definition Screen, just the name of the “source” which I call Surety. I enter the citation number with an Exclusion Marker in front of it (-1). By using this dummy citation, I can include Surety Values for this tag and see them on the screen. This is the only purpose this dummy citation serves.
6. At the bottom of the screen in the Person View is a Reference box. I use this to cross-link any sources recorded in the Research Dataset to their source numbers in the Master Source List in my “real” dataset. If I have not entered this source into the Master Source List of my real dataset, it is easy to open the dataset, create the source in the MSL, and make mental note of the Source Number assigned to it. I can then reopen the Research dataset and insert the cross-referenced number. If the source will not be cited in the dataset (perhaps it is a general reference or there was no mention of your ancestor in the source, but you want to record that you looked at it so you don’t waste efforts later and look at it a second time), I record “Exc. MSL” in the Reference field. This lets me know that this particular source will not be included in the Master Source List of my real dataset and will not be cited.
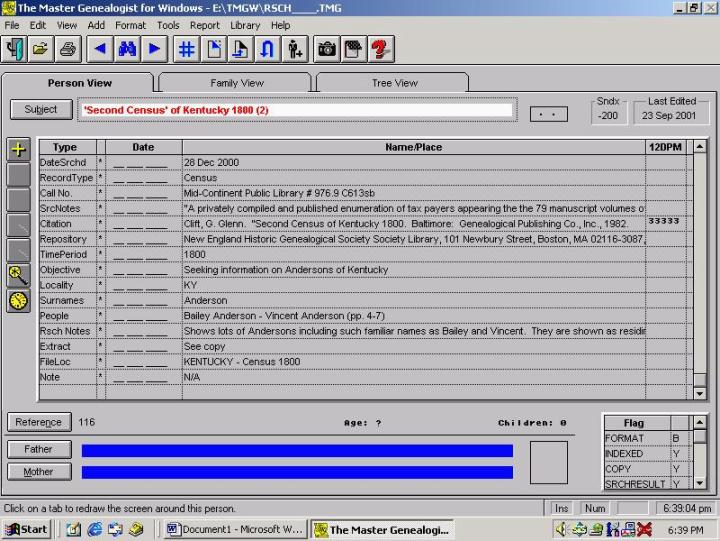
Here is what a completed “screen” looks like:
I can now generate my custom Individual Detail report. My clean-up macro will produce a finalized “Research Extract” that looks like this:
Research Summary & Extract
Subject: "Second Census" of Kentucky 1800
File Location: KENTUCKY - Census 1800.
Date Searched: 28 Dec 2000.
Record Type: Census.
Call No.: Unknown.
Source Notes:
"A privately compiled and published enumeration of tax payers
appearing in the 79 manuscript volumes of extant lists of the 42 counties in
existence
in 1800."
G. Glenn Clift is the assistant secretary of the Kentucky Historical Society.
Citation: Clift, G. Glenn. "Second Census of Kentucky 1800. Baltimore: Genealogical Publishing Co., Inc., 1982.
Repository: New England Historic Genealogical Society Society Library, 101 Newbury Street, Boston, MA 02116-3087, phone: (617) 536-5740.
Time Period: 1800.
Objective: Seeking information on Andersons of Kentucky.
Locality: KY.
Surnames: Anderson.
People: Bailey Anderson - Vincent Anderson (pp. 4-7).
Research Notes:
Shows lots of Andersons including such familiar names as Bailey and
Vincent. They are shown as residing
in Warren County and are shown on the
tax lists of 1800/01. (pp. 4-7).
Return to the TMG Tips User Tutorials Page.
Webpage design by Lee Hoffman